应用场景
需要为不同角色的用户分别提供管理系统用于管理资源。
整体架构
整体架构如图所示: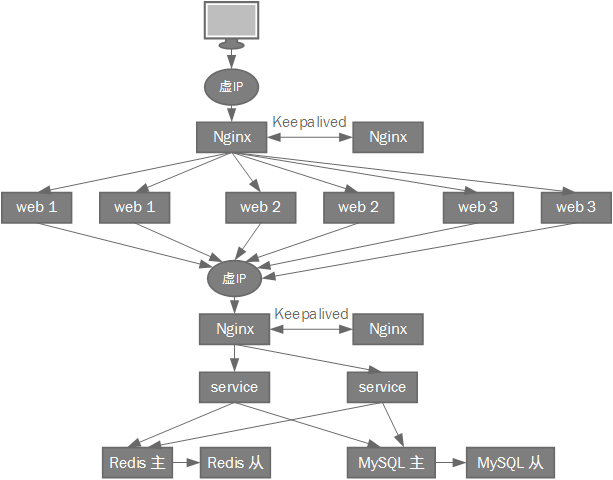
整体架构由下(数据存储)至上(页面展示):
- 数据存储于MySQL,并缓存至Redis。
- service模块采用多节点部署,封装了数据读写逻辑以及通用业务逻辑,通过Spring MVC+Hessian将通用业务逻辑以接口形式提供给其他模块调用。
- service模块通过Nginx反向代理,通过配置Nginx,可以灵活控制service模块节点数量进行水平扩展,以适应请求数量的变化,并且,service模块某个节点故障后,Nginx可以将请求转发到其他节点,从而实现service模块的高可用。
- Nginx也采用多节点部署,使用Keepalived实现高可用,对外以虚IP作为地址提供HTTP请求服务,通过Keepalived管理虚IP,初始时将虚IP分配至主Nginx所在服务器,并监控Nginx进程,当进程失败时,将虚IP漂移至从Nginx所在服务器,保证服务可用性。
- 为不用角色的用户分别提供管理系统,各管理系统各自作为独立的web模块部署,各web模块也采用多节点部署,接受用户请求并调用service模块提供的接口处理请求。
- 各web模块也通过Nginx反向代理,从而实现web模块的高可用。由于web模块需要权限验证,管理session,因此web模块的反向代理采用“ip_hash”方式,同一用户的访问请求都将转发到同一个节点上。
Nginx配置
通过配置location和upstream,将HTTP请求根据URL转发至各个模块,例如,将URL以“/remoting/”开头的HTTP请求转发至service模块:1
2
3
4
5
6
7
8
9
10
11
12upstream service-server {
server IP1:port1;
server IP2:port2;
}
server {
listen 80;
server_name localhost;
location ^~/remoting/ {
proxy_pass http://service-server;
}
...
}
Keepalived配置
在主、从Nginx所在服务器部署Keepalived,主Nginx所在服务器的Keepalived配置如下所示:1
2
3
4
5
6
7
8
9
10
11
12
13
14
15
16
17
18
19
20
21
22
23
24
25
26
27
28global_defs {
router_id web_nginx
}
vrrp_script chk_nginx {
script "/usr/local/keepalived/scripts/nginx_check.sh"
interval 2
weight -2
}
vrrp_instance VI_1 {
state BACKUP
interface eth0
virtual_router_id 179
priority 101
advert_int 1
nopreempt
authentication {
auth_type PASS
auth_pass 1111
}
virtual_ipaddress {
虚IP
}
track_script {
chk_nginx
}
}
其中,priority为101,从Nginx所在服务器的Keepalived配置类似,priority为100,Keepalived每隔2秒执行脚本nginx_check.sh,监控Nginx进程,若进程失败,则减少priority,从而将虚IP漂移至从Nginx所在服务器,nginx_check.sh脚本如下所示:1
2
3
4
5
6
7!/bin/sh
A=`ps -C nginx --no-header | wc -l`
if [ $A -eq 0 ]
then
exit 1
fi
exit 0
Hessian配置
Hessian 是一个二进制web服务协议,能够提供轻量级的web服务,Spring对Hessian作了进一步的封装,基于Spring MVC+Hessian实现服务接口提供和调用。
提供服务接口
service模块的web.xml作如下配置:1
2
3
4
5
6
7
8
9
10
11
12
13
14
15
16
17
18
19
20
21
22
23
24
25
26
27
28
29<!-- 上下文配置文件 -->
<context-param>
<param-name>contextConfigLocation</param-name>
<param-value>classpath:/spring/context*.xml</param-value>
</context-param>
<!-- 加载上下文环境 -->
<listener>
<listener-class>org.springframework.web.context.ContextLoaderListener</listener-class>
</listener>
<!-- 配置Spring MVC servlet -->
<servlet>
<servlet-name>Remoting</servlet-name>
<servlet-class>
org.springframework.web.servlet.DispatcherServlet
</servlet-class>
<init-param>
<!-- 该servlet的spring上下文采用WebApplicationContext,即listener加载的上下文 -->
<param-name>contextAttribute</param-name>
<param-value>org.springframework.web.context.WebApplicationContext.ROOT</param-value>
</init-param>
<load-on-startup>1</load-on-startup>
</servlet>
<servlet-mapping>
<servlet-name>Remoting</servlet-name>
<url-pattern>/remoting/*</url-pattern>
</servlet-mapping>
其中,先设置listener加载Spring的上下文环境,再配置Spring MVC的servlet,该servlet处理“/remoting/”开头的HTTP请求。
在service模块的Spring配置文件中配置服务实例以及web服务接口,如下所示:1
2
3
4
5
6
7
8<bean id="machineService" class="xxx.xxx.xxx.service.impl.MachineServiceImpl" />
<bean name="/machineService" class="org.springframework.remoting.caucho.HessianServiceExporter">
<property name="service" ref="machineService" />
<property name="serviceInterface">
<value>xxx.xxx.xxx.service.MachineService</value>
</property>
</bean>
部署service模块,通过“/remoting/machineService”可以调用该web服务。
调用服务接口
在web模块的Spring配置文件中配置web服务接口的调用,如下所示:1
2
3
4
5<bean id="machineService" class="org.springframework.remoting.caucho.HessianProxyFactoryBean">
<property name="serviceUrl" value="http://xxx.xxx.xxx.xxx/remoting/machineService" />
<property name="serviceInterface" value="xxx.xxx.xxx.service.MachineService" />
<property name="chunkedPost" value="false"/>
</bean>