应用场景
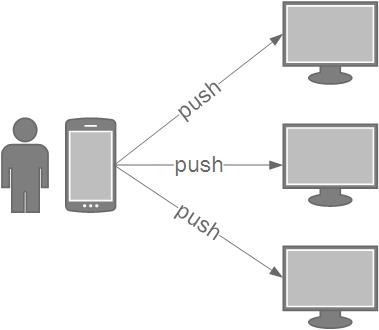
应用场景是当用户在餐饮、娱乐场所消费时,可以用手机关注商户微信公众号,并从公众号中访问商户评论页面,发表评论,评论会实时推送至现场的各个显示屏终端上,因此就需要开发一个评论消息推送系统,该系统具体需要满足:
- 能够向所有显示屏终端发送评论消息;
- 能够指定向某台显示屏终端发送评论消息。
实现方案
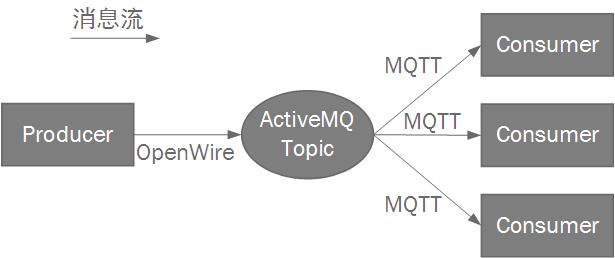
基于ActiveMQ实现评论消息推送系统,Producer使用OpenWire协议将评论消息发送至Topic,Consumer通过订阅Topic,使用MQTT协议从Topic上取到评论消息。Topic是广播模式,同一个评论消息可以被所有订阅Topic的Consumer接收,这样就可以实现向所有显示屏终端发送评论消息。在conf/activemq.xml中配置ActiveMQ支持使用OpenWire协议和MQTT协议连接,如下所示:1
2
3
4
5<transportConnectors>
<!-- DOS protection, limit concurrent connections to 1000 and frame size to 100MB -->
<transportConnector name="openwire" uri="tcp://0.0.0.0:61616?maximumConnections=1000&wireFormat.maxFrameSize=104857600"/>
<transportConnector name="mqtt" uri="mqtt://0.0.0.0:1883?maximumConnections=1000&wireFormat.maxFrameSize=104857600"/>
</transportConnectors>
如何向某台显示屏终端发送消息呢?这里参考了博客《使用ActiveMQ+MQTT实现Android点对点消息通知》 :通过在评论消息中设置一个属性记录这个消息需要发往Consumer的id,然后当消息在ActiveMQ中被分发至Consumer时,采用自定义的分发策略,该策略取出当前所有连接的Consumer,判断Consumer的id是否与消息中记录的值相等,若相等,则将消息发往这个Consumer。自定义分发策略代码如下所示:1
2
3
4
5
6
7
8
9
10
11
12
13
14
15
16
17
18
19
20
21
22
23
24
25
26
27
28
29
30
31
32
33
34
35
36
37
38
39
40
41
42public class ClientIdFilterDispatchPolicy extends SimpleDispatchPolicy {
private String ptpClientId = "PTP_CLIENTID";
private String ptpSuffix = ".PTP";
public boolean dispatch(MessageReference node, MessageEvaluationContext msgContext, List<Subscription> consumers) throws Exception {
Object _clientId = node.getMessage().getProperty(this.ptpClientId);
if (_clientId == null) super.dispatch(node, msgContext, consumers);
ActiveMQDestination _destination = node.getMessage().getDestination();
int count = 0;
for (Subscription sub : consumers) {
if (!sub.getConsumerInfo().isBrowser()) {
if (!sub.matches(node, msgContext)) {
sub.unmatched(node);
} else if ((_clientId != null) && (_destination.isTopic()) && (_clientId.equals(sub.getContext().getClientId())) && (_destination.getQualifiedName().endsWith(this.ptpSuffix))) {
sub.add(node);
count++;
} else {
sub.unmatched(node);
}
}
}
return count > 0;
}
public String getPtpClientId() {
return this.ptpClientId;
}
public void setPtpClientId(String ptpClientId) {
this.ptpClientId = ptpClientId;
}
public String getPtpSuffix() {
return this.ptpSuffix;
}
public void setPtpSuffix(String ptpSuffix) {
this.ptpSuffix = ptpSuffix;
}
}
从代码中可以看出,若消息中包含属性ptpClientId(默认属性名为“PTP_CLIENTID”)且Topic的后缀为ptpSuffix(默认后缀为“.PTP”),则判断是否有Consumer,其id与ptpClientId属性值相等,若有,则将该消息分发给该Consumer。在conf/activemq.xml中配置分发策略,如下所示:1
2
3
4
5
6
7
8
9
10
11
12
13
14<destinationPolicy>
<policyMap>
<policyEntries>
<policyEntry topic=">" >
<dispatchPolicy>
<clientIdFilterDispatchPolicy ptpSuffix=".push" ptpClientId="machineId" />
</dispatchPolicy>
<pendingMessageLimitStrategy>
<constantPendingMessageLimitStrategy limit="1000"/>
</pendingMessageLimitStrategy>
</policyEntry>
</policyEntries>
</policyMap>
</destinationPolicy>
从中可以看出,ptpClientId取值为“machineId”,ptpSuffix取值为“.push”。
消息发送
评论消息发送端代码如下所示:1
2
3
4
5
6
7
8
9
10
11
12
13
14
15
16
17
18
19
20
21
22
23
24
25
26
27
28
29
30
31
32
33
34
35
36
37
38
39
40
41
42
43
44
45
46
47
48
49
50
51
52
53
54
55
56
57
58
59
60
61
62
63
64
65
66
67
68
69
70
71
72
73
74
75
76
77
78
79
80
81
82
83
84
85
86
87
88
89
90public class PushProducer {
private static Logger logger = LoggerFactory.getLogger(PushProducer.class);
private String brokerUrl;
private Connection connection;
private Session session;
private MessageProducer messageProducer;
public void init() {
try {
ActiveMQConnectionFactory connectionFactory = new ActiveMQConnectionFactory(brokerUrl);
connection = connectionFactory.createConnection();
connection.start();
session = connection.createSession(false, Session.AUTO_ACKNOWLEDGE);
Destination destination = session.createTopic(Constants.PUSH_TOPIC_NAME);
messageProducer = session.createProducer(destination);
} catch (Exception e) {
logger.error("init producer error", e);
}
}
public void destroy() {
try {
if (session != null) {
session.close();
}
if (connection != null) {
connection.close();
}
} catch (Exception e) {
logger.error("destroy producer error", e);
}
}
public boolean pushToOne(String text, int machineId) {
try {
Message message = session.createTextMessage(text);
message.setStringProperty(Constants.PUSH_CLIENT_ID_KEY, String.valueOf(machineId));
messageProducer.send(message);
return true;
} catch (Exception e) {
logger.error("push message error", e);
}
return false;
}
public boolean pushToAll(String text) {
try {
Message message = session.createTextMessage(text);
messageProducer.send(message);
return true;
} catch (Exception e) {
logger.error("push message error", e);
}
return false;
}
public String getBrokerUrl() {
return brokerUrl;
}
public void setBrokerUrl(String brokerUrl) {
this.brokerUrl = brokerUrl;
}
public Connection getConnection() {
return connection;
}
public void setConnection(Connection connection) {
this.connection = connection;
}
public Session getSession() {
return session;
}
public void setSession(Session session) {
this.session = session;
}
public MessageProducer getMessageProducer() {
return messageProducer;
}
public void setMessageProducer(MessageProducer messageProducer) {
this.messageProducer = messageProducer;
}
}
其中:
- init方法使用JMS API建立与ActiveMQ的连接与会话,并创建MessageProducer实例。
- destroy方法关闭与ActiveMQ的连接与会话。
- pushToOne方法创建文本消息包含评论,并设置属性“machineId”,使用MessageProducer实例发送消息。
- pushToAll方法创建文本消息包含评论,使用MessageProducer实例发送消息。
消息接收
评论消息接收端代码如下所示:1
2
3
4
5
6
7
8
9
10
11
12
13
14
15
16
17
18
19
20
21
22
23
24
25
26
27
28
29
30
31
32
33
34
35
36
37
38
39
40
41
42
43
44
45
46
47
48
49
50
51
52
53
54
55
56
57
58
59
60
61
62
63
64
65
66
67
68
69
70
71
72
73
74
75
76
77
78
79
80
81
82
83
84
85
86
87
88public abstract class AuthPushConsumer implements MqttCallback {
private static Logger logger = LoggerFactory.getLogger(AuthPushConsumer.class);
private String brokerUrl;
private MqttClient mqttClient;
private int machineId;
private String password;
public AuthPushConsumer() {}
public AuthPushConsumer(String brokerUrl, int machineId, String password) {
this.brokerUrl = brokerUrl;
this.machineId = machineId;
this.password = password;
}
public void start() throws Exception {
mqttClient = new MqttClient(brokerUrl, String.valueOf(machineId), new MemoryPersistence());
MqttConnectOptions options= new MqttConnectOptions();
options.setCleanSession(true);
options.setKeepAliveInterval(30);
options.setUserName(String.valueOf(machineId));
options.setPassword(password.toCharArray());
mqttClient.setCallback(this);
mqttClient.connect(options);
mqttClient.subscribe(new String[]{Constants.PUSH_TOPIC_NAME, String.valueOf(machineId)});
logger.info("start mqtt client success");
}
public void connectionLost(Throwable throwable) {
logger.error("lost connection");
if (mqttClient != null) {
try {
mqttClient.close();
} catch (Exception e) {
logger.error("close error", e);
}
}
while (true) {
try {
start();
break;
} catch (Exception e) {
logger.error("exception", e);
if (e.getCause() instanceof ConnectException || "代理程序不可用".equals(e.getMessage())) {
try {
Thread.sleep(2000);
} catch (Exception e1) {
}
continue;
} else {
break;
}
}
}
}
public void deliveryComplete(IMqttDeliveryToken iMqttDeliveryToken) {
logger.info("delivery complete");
}
public void messageArrived(String s, MqttMessage mqttMessage) throws Exception {
System.out.println(s);
processMessage(new String(mqttMessage.getPayload()));
}
public abstract void processMessage(String message);
public int getMachineId() {
return machineId;
}
public void setMachineId(int machineId) {
this.machineId = machineId;
}
public String getPassword() {
return password;
}
public void setPassword(String password) {
this.password = password;
}
}
其中:
- start方法创建MqttClient实例,建立与ActiveMQ的连接,创建时指定id。
- connectionLost方法在连接丢失时被调用,循环调用start方法直至连接恢复。
- messageArrived方法在消息接收时被调用,调用processMessage方法执行具体的业务逻辑,例如在屏幕上显示评论。
权限验证
为了验证尝试连接的Consumer是否具有权限,开发了权限验证插件,该插件调用远程接口进行权限验证。插件配置如下所示:1
2
3
4
5
6
7
8
9
10
11<plugins>
<bean xmlns="http://www.springframework.org/schema/beans" id="AuthPlugin" class="com.vshangping.server.activemq.auth.plugin.AuthPlugin">
<property name="machineService">
<bean xmlns="http://www.springframework.org/schema/beans" id="machineService" name="machineService" class="org.springframework.remoting.caucho.HessianProxyFactoryBean">
<property name="serviceUrl" value="http://xxx.xxx.xxx.xxx/remoting/machineService" />
<property name="serviceInterface" value="xxx.xxx.server.service.MachineService" />
<property name="chunkedPost" value="false"/>
</bean>
</property>
</bean>
</plugins>
插件AuthPlugin代码如下所示:1
2
3
4
5
6
7
8
9
10
11
12
13
14
15
16
17
18
19public class AuthPlugin implements BrokerPlugin {
private static Logger logger = LoggerFactory.getLogger(AuthPlugin.class);
private MachineService machineService;
public Broker installPlugin(Broker broker) throws Exception {
logger.info("install auth plugin");
return new AuthBroker(broker, machineService);
}
public MachineService getMachineService() {
return machineService;
}
public void setMachineService(MachineService machineService) {
this.machineService = machineService;
}
}
从代码中可以看出,该插件主要功能是新建并返回AuthBroker实例,AuthBroker代码如下所示:1
2
3
4
5
6
7
8
9
10
11
12
13
14
15
16
17
18
19
20
21
22
23
24
25
26
27
28
29
30
31
32
33
34
35public class AuthBroker extends BrokerFilter {
private static Logger logger = LoggerFactory.getLogger(AuthBroker.class);
private MachineService machineService;
public AuthBroker(Broker next) {
super(next);
}
public AuthBroker(Broker next, MachineService machineService) {
super(next);
this.machineService = machineService;
}
public void addConnection(ConnectionContext context, ConnectionInfo info) throws Exception {
if (context.getConnector().toString().equals("mqtt")) {
if (!machineService.checkPassword(Integer.parseInt(info.getUserName()), info.getPassword())) {
throw new SecurityException("invalid machine " + info.getUserName());
}
}
logger.info("connect machine " + info.getUserName());
super.addConnection(context, info);
}
public MachineService getMachineService() {
return machineService;
}
public void setMachineService(MachineService machineService) {
this.machineService = machineService;
}
}
从代码中可以看出,AuthBroker继承自BrokerFilter,重写了addConnection方法,在创建连接时,对于使用MQTT协议的连接,调用远程接口的checkPassword方法,判断账号和密码是否正确,若正确则允许连接。